How To
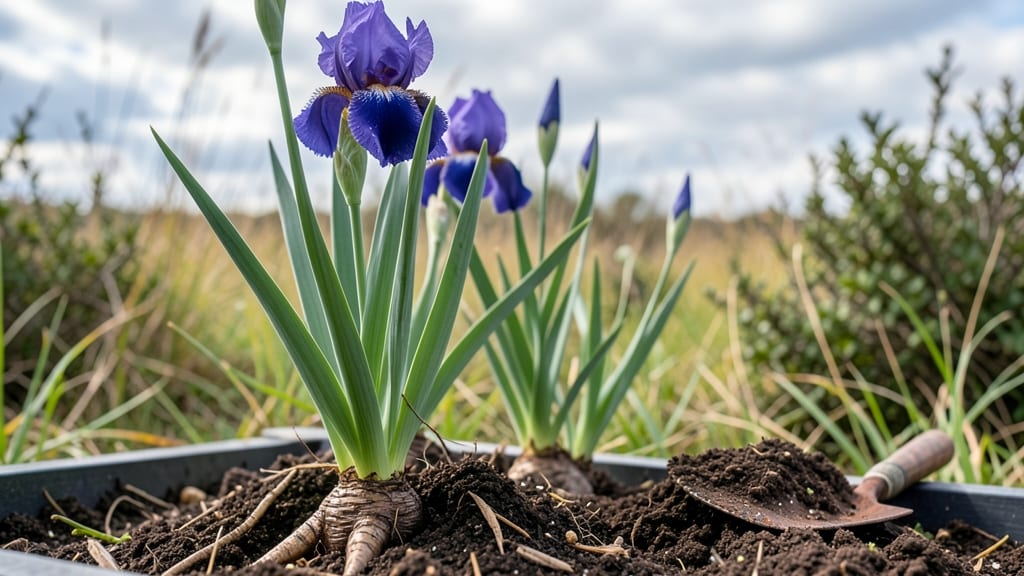
Planting iris tubers in well-drained soil transforms your garden into a riot of spring color—those velvety blooms appear like clockwork every year once you get the basics right. 🌸 I’ve planted hundreds of irises, and the difference between a thriving clump and a sad, sparse one comes down to just three key steps: choosing the right spot, prepping the soil, and positioning those rhizomes like pros.
The secret isn’t complicated—it’s about matching the iris’s natural habits. These tubers hate soggy feet, so raised beds or slopes with fast-draining soil are ideal. Most gardeners overlook the rhizome’s orientation, but planting the top flat side up (where the roots emerge) ensures faster growth.
A simple fork in the soil and a few minutes of spacing them 12 inches apart makes all the difference for airflow and future blooms.
By mid-spring, you’ll see those first sword-like leaves push through the soil, followed by stems heavy with blooms that last for weeks. The best part? Once established, irises multiply effortlessly—your first planting could become a stunning, low-maintenance border in just a few years.
Here’s how to make it happen without the guesswork.
Whether you’re working with heirloom varieties or modern hybrids, these steps work for all irises. The only real mistake is rushing—patience here means years of effortless color. Let’s get those tubers in the ground the right way.
📚 In This Guide
- What you need
- Instructions
- Tips and common mistakes
- Wrapping up and next steps
What you need
- ● Iris tubers: Healthy, firm rhizomes (tubers) with at least one fan of leaves. Aim for 1-3 tubers per square foot for a lush display.
- ● Garden soil: Well-draining, slightly sandy loam (amend with compost if your soil is heavy or clay-based).
- ● Garden fork or tiller: To loosen soil to a depth of 12-18 inches.
- ● Garden gloves: Heavy-duty to protect your hands from sharp rhizome edges.
- ● Sharp knife or pruners: For trimming old foliage and roots (sterilize with rubbing alcohol).
- ● Bone meal or balanced fertilizer (10-10-10): 1-2 tablespoons per tuber to boost root growth.
- ○ Mulch (optional but recommended): Organic mulch like pine straw or shredded bark to retain moisture and suppress weeds.
- ● Soil test kit: To check pH (iris thrives in 6.0-7.0 range).
- ● Raised bed frames: If your soil drains poorly or you’re in a wet climate.
- ● Stakes or labels: To mark planting spots (especially useful for large gardens!).
- ● Hose with gentle spray nozzle: For watering without disturbing the soil.
Step-by-step instructions for planting iris tubers
Here's how to plant iris tubers for vibrant spring blooms that'll make your garden the envy of the neighborhood.
🌱 Step 1: Choose the Right Location and Prepare the Soil
Iris tubers thrive in full sun—at least 6 hours daily—so pick a spot where they'll get plenty of light. Avoid low-lying areas where water pools, as soggy soil rots tubers. The ideal soil is well-draining, slightly sandy, and slightly acidic to neutral (pH 6.0-7.0). If your soil is heavy clay, mix in 2-3 inches of coarse sand or grit to improve drainage.
Loosen the soil to a depth of 12 inches with a garden fork or tiller. This helps roots spread easily. Work in a 2-3 inch layer of compost to enrich the soil without making it too dense. The goal is loose, airy soil that lets water drain quickly but still holds enough moisture for roots.
🪴 Step 2: Plant the Tubers at the Correct Depth and Spacing
Plant iris tubers in early fall (4-6 weeks before the first frost) or early spring (as soon as the ground thaws). Dig a hole 4-6 inches deep—the top of the tuber should sit 2 inches below the soil surface. If you plant too shallow, the tubers may dry out; too deep, and they won’t bloom well.
Space tubers 12-18 inches apart in rows 18-24 inches apart to give them room to grow. This spacing ensures good airflow, which prevents fungal diseases. Gently place the tuber in the hole with the pointy end (growth tip) facing upward. If you’re unsure which end is up, plant it sideways—iris tubers will still grow, though blooms may be slightly delayed.
☀️ Step 3: Water and Mulch for Healthy Growth
Water the newly planted tubers deeply right after planting to settle the soil around them. Keep the soil evenly moist (not soggy) for the first 2-3 weeks to encourage root establishment. After that, water once a week unless rainfall provides 1 inch of moisture. Iris tubers are drought-tolerant once established, but young plants need consistent watering.
Apply a 2-3 inch layer of mulch (like shredded bark or straw) around the base to retain moisture and suppress weeds. Avoid piling mulch directly against the tubers, as this can cause rot. In fall, add a thin layer of mulch (about 1 inch) to protect tubers from freezing temperatures. You’ll see shoots emerge in spring, signaling successful planting.
Tips & tricks for perfect iris planting
Here's what I've learned after years of growing irises—simple tricks that'll make all the difference between average blooms and showstopping spring color.
Location is Everything: That 6 hours of full sun is non-negotiable for vibrant blooms. I've planted mine near the south side of my house where they get morning sun and afternoon light. If your yard has afternoon shade, consider a raised bed—it actually gets more sun exposure than ground level. Also, watch for nearby trees that might drop leaves and create shade over time.
The Soil Secret: Don't skip that 12-inch deep loosening—it's the difference between roots spreading easily and struggling to penetrate compacted soil. I use a broadfork to break up the soil without turning it over completely. And for that 2-3 inch compost layer, I mix in a bit of worm castings too—they add beneficial microbes that help roots establish faster. Think of it as giving your irises a probiotic boost!
Planting Precision: When placing tubers 2 inches below soil level, I always make sure the pointy end faces up—it's where the new growth emerges. Confession: I skipped this once and planted them sideways, and while they still grew, the blooms were smaller and came later. Also, if your tubers are large, you can divide them before planting—each section should have at least one growth eye.
Watering Wisdom: That 2-3 week moist period is crucial for root establishment. I set up a simple drip irrigation system on a timer for the first few weeks to ensure consistent moisture without overwatering. After that, I let nature take over—irises are famously drought-tolerant once established. Just remember, soggy soil is the enemy, especially in those first critical weeks.
Pro Tips for Planting Iris Tubers
- Here's what I've learned after years of growing irises—simple tricks that'll make all the difference between average ...
- Location is Everything: That 6 hours of full sun is non-negotiable for vibrant blooms. I've planted mine near the sou...
- The Soil Secret: Don't skip that 12-inch deep loosening—it's the difference between roots spreading easily and strugg...
Frequently asked questions
Got questions about planting iris tubers? You’re not alone! Here are some of the most common concerns—plus quick, expert-friendly answers to help you grow stunning blooms with confidence.
When is the best time to plant iris tubers?
The ideal window is late summer to early fall (August–October), when the soil is still warm but cooling. This gives roots time to establish before winter. Spring planting is possible in mild climates, but tubers may struggle to root before blooming. For cooler regions, wait until spring after the last frost.
Can I plant iris tubers in winter?
Winter planting is risky unless you live in a frost-free zone. If you must plant in cold weather, cover tubers with mulch (straw or leaves) to insulate them. Wait until soil temperatures rise above 50°F (10°C) for best success. Patience is key! Spring planting (after frost) is safer for most gardeners.
What if my iris tubers rot or mold after planting?
Rot or mold usually signals overwatering or poor drainage. Ensure tubers are planted in well-draining soil (sandy loam is ideal) and avoid soggy spots. If you notice mushy tubers, dig them up, trim the damaged parts, and replant in drier soil. Pro tip: Elevate beds slightly if your yard holds water.
Do I need to divide iris tubers before planting?
Only divide tubers if they’re crowded or over 4 years old. Split clumps into smaller sections with 1–3 fans (leaf clusters) per division. Replant immediately or store in a cool, dry place until planting season. Healthy divisions = healthier blooms! Skip division for young or vigorous tubers.
How much sun do iris tubers need to thrive?
Iris tubers crave full sun (6+ hours daily) for vibrant blooms and strong growth. In hot climates, light afternoon shade can prevent stress. Partial shade may reduce flowering but is tolerable in cooler regions. Never plant in deep shade—they’ll flop and fade!
Bonus Tip: What’s the secret to getting irises to rebloom?
Reblooming irises need consistent care: deadhead spent blooms, fertilize lightly in spring (balanced 10-10-10), and avoid overwatering. Some varieties (like Louisiana irises) naturally rebloom; others may need 2–3 years to establish. Patience + sun = more flowers!
Wrapping up and next steps
Planting iris tubers is your ticket to vibrant, low-maintenance blooms that brighten any garden with their bold colors and graceful petals. 🌸 By following these three simple steps—choosing the right tubers, preparing the soil, and planting with care—you’ll set the stage for a stunning spring display.
Whether you’re a seasoned gardener or a beginner, irises are forgiving and rewarding, making them the perfect addition to your outdoor space.
Now that you’re armed with the know-how, roll up your sleeves and get planting! Grab your gloves, pick a sunny spot, and watch your garden transform into a springtime masterpiece. Happy gardening! 🌱