Tools
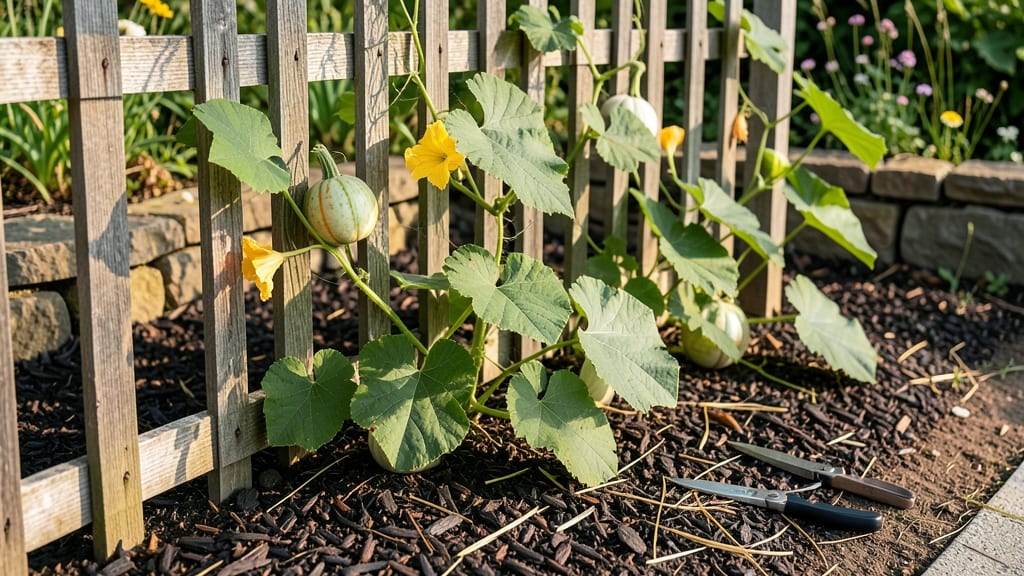
The pumpkin plant trellis transforms sprawling vines into vertical gold—three seasons of growing this way prove it’s a game-changer for space and harvests. What starts as a tangled mess becomes an organized, high-yielding system that fits even the smallest yard.
The key is choosing the right materials—strong, rust-resistant metal or wooden posts with sturdy cross-bracing—and designing for your pumpkin variety. Smaller types like ‘Jack Be Little’ climb easily, while larger ones need wider horizontal supports.
My first trellis was a simple A-frame, but I’ve since upgraded to a 4-foot-tall wire grid for better vine control.
By mid-summer, you’ll watch vines twist upward like green ribbons, producing cleaner, sun-exposed fruit that ripens faster and stores better. The real magic? You can grow twice as many pumpkins in the same space, with less risk of rot or pest damage from ground contact.
Plus, harvesting becomes a breeze—no more wrestling with vines.
Works for both warm and mild climates, though in colder zones, you’ll need to start seeds indoors and protect young vines until temperatures stabilize. Once you try it, you’ll wonder how you ever grew pumpkins any other way.
📚 In This Guide
- What you need
- Instructions
- Tips and common mistakes
- Wrapping up and next steps
What you need
- ● Trellis Structure: 6–8 wooden posts (4x4 inches, 6–8 feet tall) – for stability
- ● 2x4 lumber (8–10 feet long, 2–3 pieces) – for horizontal supports
- ● Galvanized metal mesh (1-inch grid, 6x8 feet) – or sturdy burlap/netting for vine support
- ● Fasteners: 3-inch outdoor-rated screws (20–30 pieces)
- ● Heavy-duty zip ties (50+ pieces) – for securing vines
- ● Tools: Power drill + drill bits
- ● Measuring tape
- ● Level
- ● Saw (hand or circular)
- ● Post anchors or concrete mix – to secure posts in windy areas
- ● PVC pipes or wire cages – for lightweight, temporary trellises
- ● Pruning shears – to train vines efficiently
- ● Garden twine – for extra vine support
Step-by-Step instructions for building a pumpkin trellis system
Here's how to transform limited space into a thriving pumpkin garden that yields bigger, healthier fruits.
Select and Prepare the Trellis Structure
Choose a sturdy trellis design that can support 15-20 pounds per vine—think 8-foot-tall T-posts spaced 6 feet apart with horizontal wires at 2-foot intervals. I use 1/2-inch galvanized wire for durability, stretching it tightly between posts to create a ladder-like frame. The first wire should sit 12 inches above the ground to encourage early vine growth.
For a 4-plant system, you'll need two 8-foot posts and four horizontal wires. Drive the posts into the ground until they're stable but not wobbly—think of a sturdy fence post. If your soil is rocky, use concrete anchors to secure the base. This prevents the structure from toppling when vines get heavy with fruit.
Plant Pumpkin Seeds at the Base of the Trellis
Sow 4 pumpkin seeds (one per plant) 1 inch deep in well-draining soil, placing them 2 feet away from the trellis posts in a square formation. Use large pumpkin varieties like 'Jarrahdale' or 'Howden'—they're bred for trellising and produce 10-15 pound fruits without toppling the structure. Water deeply after planting to settle the soil around the seeds.
Wait until true leaves appear (about 7-10 days) before encouraging vines to climb. Until then, let the seedlings grow naturally. If you plant too early, the vines may struggle to reach the trellis before powdery mildew sets in—a common issue with crowded, humid foliage.
Train Vines Upward and Prune Strategically
Once vines reach 12 inches long, gently guide the strongest stem toward the lowest trellis wire and secure it with soft plant ties (never wire or twine—it cuts into the vine). Let one main vine per plant climb upward, pruning all side shoots below the first 3 leaves to direct energy into fruit production. This ensures the plant puts its resources into one massive pumpkin rather than multiple small ones.
When the vine reaches the top wire, pinch off the growing tip to encourage lateral branching—this creates more fruiting zones. You'll see new shoots emerge from the leaf axils; let two of these grow upward while pruning the rest. This method keeps the plant compact and manageable while maximizing yield.
Maintain Support and Monitor Fruit Development
As pumpkins form, tie them to the trellis with soft fabric strips to prevent them from dragging the vine downward. A 10-pound pumpkin can pull a vine 2 feet off the structure, so check weekly and adjust ties. Water deeply 2-3 times per week, focusing on the soil near the base—trellised pumpkins need consistent moisture to avoid cracking or misshapen fruit.
Watch for yellowing leaves—this usually means overwatering or nutrient deficiency. If the soil feels soggy to the touch, cut back on watering. If leaves are pale and sparse, add a balanced fertilizer (10-10-10) at half strength every 4 weeks. The goal is steady growth, not rapid spikes that lead to weak stems.
Harvest at Peak Ripeness
Pumpkins are ready when their stem dries and hardens and the skin turns dull (no longer shiny). Gently twist the pumpkin to separate it from the vine—it should pop off cleanly without tearing. Larger varieties like 'Howden' take 90-100 days to mature, so mark your planting date to track progress. Harvest on a dry morning to let the skin harden before storage.
After harvest, remove all vines and debris to prevent disease buildup in the soil. If you're planting another crop in the same space, rotate locations yearly—pumpkins are heavy feeders and deplete nutrients quickly. Store harvested pumpkins in a cool, dry place (50-55°F) for 2-3 months to enjoy their flavor long after the garden season ends.
Tips & tricks for building a pumpkin trellis system
Transforming your pumpkin patch into a vertical garden isn't just about saving space—it's about unlocking the potential for larger, healthier fruits. Here are the insights I've gathered from years of trellising pumpkins that will help you avoid common pitfalls and maximize your harvest.
Structure Stability: When assembling your trellis in Step 1, pay special attention to the 12-inch height of that first wire—this isn't arbitrary. It creates the perfect angle for early vine growth without overstretching tender seedlings. I've seen many gardeners skip this detail and end up with vines that struggle to reach the first wire, leading to weak stems that can't support fruit later. Use a level to ensure your posts are perfectly vertical before securing the wires, and double-check that the 8-foot posts are firmly anchored. In windy areas, consider adding diagonal bracing between posts for extra stability, especially if you're growing varieties that produce 10-15 pound pumpkins.
Seedling Timing: The 7-10 day window mentioned in Step 2 for true leaves to appear is crucial for disease prevention. I recommend marking your planting date on a calendar and setting a reminder for day 7. This helps you avoid the common mistake of encouraging vines to climb too early, which can lead to powdery mildew—especially in humid climates. If you notice seedlings struggling before this time, focus on keeping the soil consistently moist (about 1 inch of water per week) rather than pushing the vines upward. The goal is strong, healthy seedlings that can handle the weight of climbing.
Pruning Precision: In Step 3, when you're pruning side shoots below the first three leaves, resist the temptation to be overly aggressive. Leave one or two small leaves attached to each shoot you remove—they help the plant photosynthesize while it redirects energy to the main vine. I've found that gardeners often prune too much too soon, which can stress the plant. For varieties like 'Howden', aim to maintain just one main vine per plant with two lateral branches after the vine reaches the top wire. This balance ensures you get that single massive pumpkin without sacrificing plant health.
Fruit Support Strategy: The moment pumpkins begin forming in Step 4 is when many gardeners underestimate the weight factor. A 10-pound pumpkin isn't just heavy—it creates significant downward force that can pull vines off the trellis. I recommend using wide fabric strips (about 2 inches wide) for tying, as they distribute weight more evenly than narrow ties. Check these ties weekly, especially after rain when pumpkins absorb more water. For extra security, consider adding a second tie higher up on the vine once the pumpkin reaches 5 pounds—this creates a more stable anchor point.
Pro Tips for Pumpkin Plant Trellis
- Transforming your pumpkin patch into a vertical garden isn't just about saving space—it's about unlocking the potential for larger, healthier fruits.
- Structure Stability: When assembling your trellis in Step 1, pay special attention to the 12-inch height of that first wire—this isn't arbitrary.
- Seedling Timing: The 7-10 day window mentioned in Step 2 for true leaves to appear is crucial for disease prevention.
Frequently asked questions
Got questions about pumpkin trellises? You’re not alone!
Here are answers to the most common queries to help you grow like a pro.
Why should I use a trellis for pumpkins?
A trellis saves space, improves air circulation (reducing disease risk), and makes harvesting easier. Plus, vining varieties like Cinderella or Jack Be Little thrive vertically, producing fewer but larger, cleaner pumpkins.
When is the best time to set up a pumpkin trellis?
Install your trellis before planting seeds or seedlings—typically 2–4 weeks ahead in spring (after the last frost). For fall crops, set it up as soon as soil warms to 60°F+. Use bamboo stakes or A-frame trellises for stability, and train vines early to avoid overcrowding.
What if my pumpkin vines don’t climb the trellis?
Pumpkins are weak climbers—they need encouragement! Gently tie vines to the trellis with soft plant ties or old T-shirts every 3–5 feet. Prune excess side shoots to focus energy upward, and ensure the trellis is sturdy enough to support 10+ lbs of fruit. Pro tip: Use a spiral trellis for bushier varieties like Sugar Pie.
Can I use a trellis for giant pumpkins?
Giant varieties (e.g., Atlantic Giant) don’t trellis well—they’re too heavy! Instead, use a low, wide support system (like a pallet or wire mesh) to lift vines slightly off the ground. Focus on space (20+ sq ft per plant) and soil nutrients (compost + fertilizer) for maximum growth.
What’s the easiest DIY trellis for beginners?
Start with a T-post trellis: Drive 6–8 ft wooden posts into the ground, 3–4 ft apart, and weave galvanized wire or jute twine in a crisscross pattern. For a no-tools option, use bamboo poles lashed together with zip ties. Add a crossbar at the top for extra stability. Bonus: Repurpose old ladders or fences!
Do pumpkin trellises work in cold climates?
Yes, but choose cold-hardy varieties (e.g., Howden or New England Pie) and use a temporary trellis (like a hoop house with row cover) to extend the season. In Zone 3–5, start seeds indoors and transplant to the trellis after frost. Mulch heavily to protect roots.
Wrapping up and next steps
Transforming your pumpkin patch with a trellis isn’t just clever—it’s a game-changer! 🌱 Whether you’re saving space, protecting your gourds, or aiming for bigger harvests, a well-built trellis turns challenges into opportunities.
With the right materials, a little creativity, and the tips you’ve learned, you’re now ready to grow like a pro.
Ready to get started? Grab your tools, pick your pumpkins, and turn your garden into a thriving vertical wonderland! 🚀 Happy planting—your future harvests will thank you!